JD Edwards 1099 in 3 Days
While the 1099 season may only come around once a year, the process continues to be time consuming and frustrating for JD Edwards users. Every 12 months we find that many customers forget or miss-steps, spend days frustrated, and inadequate instructions make this task truly difficult. The team at Centrilogic has eliminated the guesswork and with years of experience, we have outlined the best practices to help you avoid errors and issues, and make filing your 1099s with the AP Method a breeze.
Centrilogic’s JD Edwards expert Grant McIver has broken down the process into just 3 days of work. Our guide gives you small, manageable, and concrete steps that must be done, but are easy to follow. This helpful guide has links to resources including the Ultimate 1099 Checklist compiled by the JD Edwards team at Centrilogic.
Our team recommends the following timeline to ensure that your 1099s meet the required deadline to avoid any additional stress if issues arise.
Recommended Timelines:
- 2nd week of January – Deploy the required 1099 ESU into JDE Production
- 3rd week of January – Perform your 1099 processing (data/printing/e-file)
- 4th (last) week of January – Submit your 1099s to the IRS and mail forms to vendors.
Day 1 ESU Validation
Day 1 is the easiest day and will help set you up for success as you move through the process. This validation step is critical to ensure you have all the proper settings in place as you move into the more complex elements.
Please be aware of the updates for the 2021 ESU:
- New 1099-G Form now available. This is available only through the AP Method.
- NEC Form now has 3 forms per page (previously 2).
- NEC Combined Federal/State Filing available (e-file), this wasn’t available last year.
- Various box changes on NEC/MISC/DIV forms.
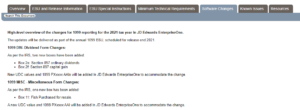
Where to find important Oracle documents
If you have an Oracle support account, check Oracle Doc ID 2388271.2 frequently between November and January. This is where any of the new ESU releases will be documented. Knowing in advance that there is a new download and having it installed will help you be more prepared Day 1. Typically, the ESU is released by mid-December. For example: this year’s was released on December 15th.
Find new releases here:
Find any special instructions here:

Find any software changes here:
Known Issues Tab
- The Known Issues tab is important. If you are experiencing any issues, check the Known Issues tab as a starting point. If the issue is listed there then it is currently being looked into by Oracle and they will update any known bugs accordingly. It’s possible you may need to install another ESU. We recommend checking the site frequently throughout January so you can follow any new issues.
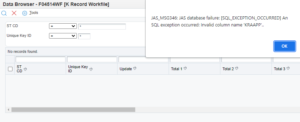
- For 2021, there were some problems with table F04514WF. Be sure to perform a Find in data browser for this table. If you see the message below then contact your CNC to regenerate this table.
Tips for ESU Validation
Typically, ESU Validation is best done by a business analyst—someone within the organization who has a thorough understanding of JDE objects including BI Publisher.
Step 1: Verify User Defined Codes – Mandatory (Get the correct list here). We recommend making sure all codes are correct by reconciling the codes you currently have with this list. Accuracy is crucial here. New codes were added for 2021.
Step 2: Versions – Oracle does recommend that all custom or copied versions be deleted and then recreated after the 1099 ESU has been applied. At Centrilogic, we typically don’t create custom versions unless there is a special data selection based on Company Numbers.
Step 3: Validate BI Publisher – It is important to validate that the BI publisher portion of the ESU has been successful.
If you experience issues, begin troubleshooting with the following programs to validate that the templates exist, are accurate, and older template references has successfully been removed.
- P95600 will verify templates exist and that the effective dates are correct.
- P95620 will verify that templates from previous years are removed to eliminate user confusion.
Step 4: Validate processing options
Make sure to verify the processing options are on the following objects:
- P04515 – Write Media
- P04515A – Export 1099 Electronic Media Work File (make sure you know where the file is written to on the Enterprise Server so you know where to get the file).
Pro Tip: For P04515, check the Source Version to determine how your documents will be printed. Ex: XJDE0003 will print a one per page sheet.
Step 5: Security Updates – Be sure to determine if new objects need to be added to security roles. For 2021, object R045156 needs to be added for 1099-G form.
Step 6: Menu Updates – Update new menus. There are currently no new menu updates for 2021, but always check to be sure.
Step 7: Testing – To finalize Day 1, run some tests to make sure your ESU Validation is ready for Day 2 and everything is working as expected.
- Verify expected results for Vendors/Types in table F045143 after the workfile build.
- Verify the output of Blank Forms by checking that the years are appearing and the data prints correctly.
- Verify the output of pre-printed forms.
- Adjust BI templates with caution (see notes below regarding modifying BI Templates).
- 1099 outputs are suppressed when minimum amounts are not met.
- E-File output – You can attempt to submit a test file to https://fire.test.irs.gov (This can be done in the month of January)
A quick note about modifying BI Templates:
If you receive a request to modify your templates, understand that this is not an easy task and Oracle will not support this process. When making edits, be very careful that you are not shifting data around. Practice extreme diligence and follow our pro-tips below.
- Take backups of the BI Templates before modifying them.
- Be cautious when editing/modifying forms for mailing purposes. Be sure not to shift things up or down; try changing font size or spacing using the <enter> key.
- If you wish to print one 1099 per-page including the instructions, let us know – we have a trick to accomplish that!
Final Tips for Day 1: Take Backups of the following tables:
- 1099 AP Worktable (F045143)
- 1099 GL Worktable (F045141)
- 1099 Merged Worktable (F04514)
- 1099 Electronic Media table (F04515OW)
- txt from the Enterprise Server
- UDCs (F0005) for 01/07, 04/TR, 04/ST
We recommend taking backups after you’ve finished processing for the year, every year. This is helpful for resolving any questions or for providing corrections.
Day 2 Data Preparation
Day 2 presents the most challenges when it comes to performing 1099’s using the AP Method. This is typically when mistakes in the process are made. Start by understanding the way in which the AP Method relies on the use of Category Code 07 in the Address Book. This base knowledge will help you to better move through the process as you understand how the data is stored and utilized. It is important to know that the Category Code 07 value flows from the Address Book (table F0101) to Vouchers (F0411). This data can be overridden at time of Voucher Entry or changed later.
Step 1: Verify Company Setup
If you did this last year, it is likely that everything is correct and ready this year; but, to avoid timely mistakes, we recommend verifying the data as your first step.
Make sure that the following are filled in and accurate:
- Tax ID
- Mailing Name and JD Edwards will only take the last line that was updated. If you need to edit your address, put it all on one Address Line to make sure it populates correctly.)
- Ex: If Address Lines 1 and 2 are populated for the company then only Address Line 2 will display on the 1099 forms.
- Related Address – if you have multiple entities set up you will need to choose a Parent number or Address Number.
- Under Address Book be sure there is a Contact Name under Who’s Who. Also, add a phone number and email address as it is a required field for the e-file. Without the phone number, it is possible this will fail when submitted to the IRS.
Step 2: Verifying Supplier Setup
Remember, the data for the vendors flows from the Address Book to the Vouchers.
- Tax ID for the vendor. You do not need to add dashes as JDE will strip them out and add them where they need to be.
- Legal Name, if the 1099 legal name is different than the current mailing name then ensure you add the Who’s Who Mailing Name with Type Code “1099 Legal Name”. Both the base Mailing Name and 1099 Legal Name will print on the 1099 forms.
- Mailing Address- a reminder, the 1099 process will only take the last populated line for Address Lines 1-4, so put everything on one line.
- Ex: If Address Lines 1 and 2 are populated for the vendor then only Address Line 2 will populate on the 1099 forms and efile.
- The Pers/Corp Code must be set for every vendor. For 1099, only worry about the Non-corporate entity (N) and Individuals (P).
- Tip: If you need help identifying a Type N or Type P, look for the following:
- Type N – Non-Corporate Entity will typically have a TIN # with the dash in the third spot, ex: 12-3456789
- Type P – Individual will typically have a TIN # with two dashes. Ex: 123-45-6789
- Tip: If you need help identifying a Type N or Type P, look for the following:
- If you have a foreign vendor, you need to change the Payables to F for Foreign Supplier.
- Checkpoint: If you are generating your 1099 and you are not getting the vendors you are expecting, check their Pers/Corp code
- Linking multiple vendors with the same TIN:
- If you need to link multiple vendors who only need one 1099, use the Related Address Centrilogic recommends using the 2nd Address Number, and linking the accounts. Be sure that the Personal/Corporation Code and the Tax ID is the exact same on those records or the combining will not work.
- Populate the default category code 07 value (e.g., B1) for the vendors
Important notes regarding the Global Update R04802:
Use Global Update R04802 to copy the Category Code 07 value from the Address Book (F0101) to the Supplier Ledger (F0411). If you miss this step, your information will not be correct.
- This will update the entire history of the vendor, it can not be limited to a specific fiscal year.
- Use the data selection to select the Address Numbers that you want to update.
- Use the Chrome Data Selection Import tool to enter multiple vendor numbers in the data selection
If you need to update category code 07 for select vouchers then use the Speed Status Change (P0411S) screen, ensure that the Pay Status is set to “P” to find the existing paid vouchers.
Day 3 Printing and Filing
Welcome to the core process of 1099! Our goal is to make this process easy for you.
- Clear the AP Workfile (R04CLRFP)
- Build the AP Workfile (R04514FP)
- Make any adjustments (P04510FP)
- Review the workfile (export F045143 / Preview 1099 media)
- Write Media, create PDFs and e-file (P04515)
- Print PDFs and submit e-file
Feel free to follow the steps from our sample E1 page here. If you are not on E1 pages yet contact us to help you get to E1 pages.
E-filing
If you are still printing and mailing and not yet e-filing with the IRS, now is the time to get that process in place. As a reminder, JDE only provides “Copy B” of the 1099 prints which is only valid for vendors, not the IRS. The IRS only uses “Copy A”. If you print the 1099’s for the IRS you will need to do so on special pre-printed paper and use the “Pre-Printed Forms” option in the Write Media. If you need any help with transitioning to e-file, reach out to our team to get started.
Step 1: Clear AP Workfile
Run the clear AP workfile. This will clear out the F045143 data table.
Step 2: Build A/P Workfile
- Go to Data Selection and set the following:
- Left Operand to: Category Code – Address Book 07 (F0411) (AC07)
- Set the Comparison to – Is Equal To
- Set the Right Operand to: Literal, and then add your type; EX:(B1)
- Confirm that the year is correct for the Reporting Year
- Alternate Address Combining Method – refer to Day 2 and align your Alternate address if you need to combine companies.
- Ensure the Type of Return matches your Category Code 07 value from the data selection
This will need to be done for every single return type that you need. Let the process run and confirm that the data is available.
Step 3: Write Media
Start by testing the PDF version first. These instructions are for 1099- MISC and 1099-NEC
- Set the reporting year (e.g., 2021).
- Select the Type of Return (e.g., 1099- MISC or 1099-NEC)
- Under Reporting Medium Select Paper Forms
- Under Return Status set the option to “Original”
- Select your Form Type either Preprinted Forms or Blank Sheets.
- Submit this as a report.
- Find your report under “Submitted Reports” (If there are many vendors in your 1099 list, then this may take a little bit of time.)
- Check the accuracy of the data on the form, including the Instructions for Recipient if printing.
- If reviewing Blank Sheets forms, then this version will be marked “Copy B” and is intended for your vendors, not the IRS.
For e-file
- Follow all steps for the PDF version, but under Reporting Medium, switch to Electronic File
- You will need your Transmitter Company ID Number, this comes from your Day 2 information where you validated your company information.
- Transmitter Control Code – you will need this to e-file. If you do not know it, you will need to contact the IRS to obtain that number.
- If you do not have one, you will need to fill out the IRS Form 4419 located on https://fire.irs.gov website to obtain a number to file electronically.
- Contact Email Address – as a best practice enter your email.
- Under media File Options – select the box for “Combined Federal State Filing”
- Please note: You will need to check for qualifications state by state in regards to the “Combined Federal State Filing” to make sure submissions were completed properly.
Step 4: Export 1099 Electronic Media Work File
Select Form/Export and click the OK when prompted. It writes the “IRSTAX.txt” file to the location you specified on the P04515A processing options. You will need to have this file to submit it to the IRS, work with your IT team to get this from the server. You can test the file first at the test site. You will submit that file to the IRS Fire Site.
Once you have submitted, you can check daily on the status of your file to make sure there are no errors.
If you have any questions, or need any support with your JDE process for 1099’s, get in touch with the team at Centrilogic. If you enjoyed this checklist we have included a copy of the checklist here for you to keep on hand.